Monday, January 31, 2011

Valentines Day

Valentine's Day

Looking for something to make for your daughter, try these easy bows. You can make them any color or size. I chose to do them Valentine's day colors since V-Day is coming up.


Step 1: Buy some Valentine's Day Ribbons. I bought these ones at the Dollar Tree. Super cheap and super cute. You also need a glue gun and the clips for the bows. You can buy them at any Beauty Supply Store. Here is a picture to make sure you get the right ones.
Step 2: Cover the metal prong clip with a solid ribbon. preferrably a skinny one. Glue it on with the glue gun.

Step 3: Put the clip aside for a few minutes and grab the decorated ribbon. Make two loops with it. It's kind of like tying your shoes. Then you will cut off the ribbon after the loops touch and glue it on the bottom. Make it like medium size. When you are done with the medium size one, make a smaller one that can fit on top of it.

Step 4: Glue the small one on top of the big one. Then take the same ribbon and glue it vertically on the bottom of the big one. You are going to be making a center for the ribbon. Loop it all around and glue it down again.

Step 5: Glue the clip on the back of the ribbon. ENJOY!


Another thing that I have found useful to store bows on is a ribbon hanger. I will post the steps to make this. It is super easy.

Step 1: Get a thick ribbon. Cut it as long as you think you will want your hanger to be.


Step 2: Make a loop at the top of one side. and glue it down. You may need to glue in several places. I have done one before this black one and have found that if the ribbon has wire in it, it is easier to bend.

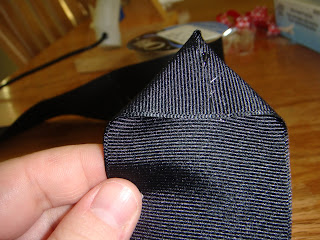
Step 3: At the opposite end, glue and fold into a triangle. It will look kind of like a tie.

*** Now you are done and can hang it up through the hoop with either a hook or a tack. It is great for organizing.***

If you are into Bows and flowers, send us an email and I will tell you a few more ways that you can make them.


Photobucket

Wednesday, January 5, 2011

Simplify Your Life in 2011

So if you haven't already, you should sign up for Groopdealz!!! What is Groopdealz? Heres how it works:
-Groopdealz posts an amazing new deal each day. Make sure you subscribe to their emails, that way you wont miss out on a good deal! Sometimes...you can even get up to 90% off! (WOAH! Right?)

The whole point of this is to show you the amazing deal thats featured on Groopdealz today.


Wonderfully Wordy
This super cute Vinyl Word Decal from Wonderfully Wordy. The best part is...its only $6 (originally $12). Shipping is $1.50, no matter how many you buy. Go ahead, go to Groopdealz now and order yours!


Photobucket

Sunday, January 2, 2011

Dry Erase Dinner Menu

I don't know about you guys...but I'm not a huge fan of chalk. My mom has a chalk board where she writes down our dinner menu for each week, and its not my favorite. I've seen on other blogs where people make dry erase things out of picture frames. I figured, why not make her a menu board? So heres how I did it.


You need a frame, a 8x12 one (unless you want a smaller one.) 
I bought this frame at the dollar store.


 If you like the color of your frame, awesome...if not, paint it!
I was going to spray paint this one black...but we didn't have any spray paint. 
I used craft paint... and painted two coats. Make sure you tape up the glass, 
unless you can take the glass out.... it was hard to take the glass out of this 
frame, so I just taped it up.


I opened a word document and typed up a cute menu outline.
If you want the outline, just email me at pinkypromises.blog@gmail.com 
and I'd be happy to send it to you.
(I don't know how to link downloads on here yet.)

I waited for the paint to dry and then stuck the menu outline in the frame...
 and ta-da! Couldn't be any easier and its a super cute project. Use a dry erase 
marker and write on the glass, it wipes right off :)


Photobucket

Wednesday, December 29, 2010

3x5 Card Address Book

It's time to celebrate. This our FIRST POST EVER!! (WOO! Go us!)
We got this idea from Kierste at Brown Paper Packages. 
She has a whole tutorial on how to make them, which you can find here.


We figured we could add something to make it our own... so we added alphabet letters, 
and put two 3x5 cards in between each letter (of course you can add more later.) 

This is mine...

and this is Jessica's.


I guess its kind of late to make these for Christmas presents, but why not make one just because?....we did :)


Photobucket